Tuesday, May 31, 2011

Wood Veneer Sneak Peak

I hope everyone had a fantastic Memorial Day weekend.  I spent the holiday weekend with my family.  We hung out by the pool, grilled, and attended a charity event raising money to build homes from soldiers.  It was a nice getaway and a nice way to remember those who do so much for our country.

To any military personnel who may be reading:  Thank you for your service and sacrifice.

On an entirely unrelated note,  here's a sneak-peek of the wood veneer adventure.  I say adventure, because it's been slightly less than smooth sailing.  I've actually shoved the entire thing into a corner because it's been rather frustrating.  And I've started about six other projects to distract me from this one...


Never being one to quit, I plan on spending a good deal of time tonight on it.  Fingers crossed all goes well!


Friday, May 27, 2011

Party Week: Pizza on the Grill

As Party Week comes to a close, let's wrap up with food.  Picking what food to serve at a party can be tricky, because you  have to take into account so many different factors.  For large groups, with diverse taste preferences, I like to serve versatile food that allows for some customization.  Pizza on the grill is a perfect meal for the summer get together.  It's easy to make.  It can accommodate any size group, and everyone gets to help. The first step is to prepare the dough.  I did this before the party, and brought the dough with me.  It still needed to do the second rise, which worked out great, because the dough was finished about the time everyone was hungry.  I always use the same Martha Stewart recipe from a cookbook I have.  I found a similar one on her website and you can find it here.

The only remotely difficult part of the process, is making sure the yeast blooms enough.  If you don't have a kitchen thermometer, this can be tricky.  The water is supposed to be heated to 110 degrees, which is pretty hot, but if you get the water too hot you could kill the yeast.  However, from my experiences (both with and without a thermometer), I'd err on the side of hotter water.  I've included a picture of how foamy the yeast mixture should be.

Ingredients:

  • 1 cup warm water (110 degrees)
  • 1 tablespoon sugar
  • 1 packet active dry yeast
  • 1 tsp salt
  • 2 1/4 cups all purpose flour
  • 1 1/2 tbsp. olive oil, plus more to coat bowl.
Instructions:
  • Combine the sugar and water in a bowl.  Stir to dissolve the sugar, then add the yeast.  Mix with a fork until the yeast dissolves and the water is brown.  Let stand 5-10 minutes until the mixture is foamy.
  • Add the flour and salt to the bowl of a food processor.  Pulse several times to mix.  Add the olive oil and yeast mixture to the bowl.  Pulse until the dough just comes together.
  • Knead and allow to rise 1 hour. Punch down dough and fold onto itself. Allow to rise for an additional 30 minutes. 


After the dough is ready, it's time to grill it!  You're probably fairly skeptical at this point.  That's alright, so were all of my friends.  I'm pretty sure I know they thought this was going to turn into a colossal disaster, and that we'd end up ordering pizza instead of making it.  As luck would have it, I did know what I was doing and everyone's pizza turned out great!


Now go try your hand at your own pizza on the grill this weekend!
I hope everyone enjoyed Party Week as much as I did!
Happy Memorial Day All- Be Safe and Have Fun!

Thursday, May 26, 2011

Party Week: Libations


Today's post is all about libations.  Summertime drinks are very near and dear to my heart.  From lemonade to sun tea to more adult beverages they always seem to evoke memories of summer, sunshine, and the lake.  These two drinks are perfect for any summer gathering and take advantage of seasonal produce.

First Up: the Mojito
As far as adult beverages go, there may not be a more refreshing drink than the mojito.  With hints of mint, lime, and a little sugar, the mojito is a perfect beverage to enjoy pool side, patio side or (my favorite) lake side.

Recently I started making simple syrups to flavor my drinks, instead of trying to stir in sugar.  I cannot tell you how much better it is.  The sugar is already melted so mixing is a breeze and you can steep the syrup with basically any flavoring agent you want.  Jason and I always have a pitcher of ice tea in our refrigerator, but we never sweeten it.  A simple syrup is great for those rare days that I want my tea sweetened or (more often) a friend comes over and wants sweet tea.  Simple syrups are made with equal parts water and sugar and heated until the sugar dissolves.  Then add any flavoring agent (I've been really big into mint lately) that you want.  Simple syrups are perfect in mojitos because they allow you to add the mint flavor without needing to muddle the mint first.  I still add a couple shredded mint leaves to the glass, but that's just for presentation.  Bobby Flay's mojito recipe is my current favorite:

Ingredients:

  • 2 cups ice
  • 1 cup lime-mint simple syrup
  • 1 liter white rum
  • 1/2 cup fresh lime juice
  • Club soda

Instructions:

  • To make the simple syrup, heat 1 cup water and 1 cup sugar until the sugar dissolves.  Add 1/2 cup fresh mint leaves and 2 zest of 2 limes.  Steep for 30 minutes, until the mixture cools.  Strain out the zest and mint leaves.  Will keep for approximately one week.
  • Combine the syrup, rum, lime juice, and ice in a large pitcher.  Top of with club soda to taste.  Squeeze a lime wedge and extra mint leaves into each glass to garnish.
Next Up: Cucumber Lemongrass Agua Fresca
I've recently become obsessed with Agua Frescas.  Basically it's just water flavored with fruits, but man oh man is it tasty.  They're a perfect summer drink, because they're not overly sweet, not overly overpowering, and incredibly satisfying.  There are dozens of agua fresca recipes available, but I chose cucumber lemongrass, for its vivid green color and deliciously refreshing taste.  Lemongrass may not be a common ingredient for most people, but fear not!  It's readily available with the fresh herbs in most grocery stores.  It looks kind of like ...well...a stalk of grass.  This recipe is from Matt Armendariz, photographer and food blogger extraordinaire.  His blog is one of my all-time favorites, and once you try this recipe, you'll realize why.  And in case you don't love cucumbers, there are several other agua fresca recipes available on his blog.

Lemongrass Simple Syrup- Use a rolling pin to mash a stalk of lemon grass.  Cut it into 4 sections.  Heat 3/4 cup sugar and 3/4 cup water to a boil.  Add the lemongrass and steep until the mixture is cool.  Remove the lemon grass.

Agua Fresca-
Ingredients
  • 4 cups chopped english cucumber (skin on) with 2-4 cups of water to blend
  • 8-10 cups of water
  • 1/2 cup fresh lime, to taste
  • Pinch of salt.
Instructions:
  • Puree the fruit and water in a blender, adding as much water is necessary.  Strain the mixture to remove seeds and pulp.  I did two different strains: one through a sieve and then a second one through  cheesecloth.
  • Add the simple syrup to the mixture and the 8-10 cups of water, adjusting the amount to how strong/weak you want the drink.
  • Add the lime juice and serve.  
Whip some of these delicious drinks up for Memorial Day, your friends and taste-buds will thank you!

Wednesday, May 25, 2011

Party Week: Let's Get Saucy, Homemade Caramel Sauce

I'm not a huge fan of sweets, never have been.  However, if you put a container of caramel in front of me, I will eat it until I am sick to my stomach.  A party isn't complete without some form of sugar, and this versatile and tasty treat is good for all kinds of foods.  Spoon it on ice cream.  Drizzle it on fruit.  Use it for a dip.  The possibilities are basically endless.  The process is really simple, but there are a couple of tricks to make everything run smoothly.  And it only requires 3 ingredients!  Score!

Recipe adapted from Simply Recipes and is available in full here.
Tips and Tricks:

  • Use a heavy bottomed pan with tall sides.  It needs to be heavy bottomed or else the sugar will cook too quickly and burn.  And no one wants to eat burnt sugar.  I used a cheap-o pan the very first time I tried this, and it was a sticky disaster.  You  need tall sides because the mixture will bubble vigorously when you add the butter and cream.  Melted sugar is way hotter than boiling water so splatters can be dangerous.  It's so hot that I melted my favorite spoon the first time...and yes, that was the same first time I burnt the sauce.  It was not a very good first try, but at least I can pass on some tricks.
  • You need everything readily accessible and be ready to move quickly.  My pictures are a tad blurry, because it really is a fast process.  If you don't whisk quickly enough, especially when you add the cream, your sauce could come out lumpy.
  • Don't be afraid!  It's really not too difficult and the results are pretty outstanding.  I also throw in a sprinkle of fleur de sel at the end, because I'm fancy like that.  :)
  • If you're really afraid of burning the sauce, there are several recipes online that add water to the sugar.  This will ensure a slower and more even cooking time, but it will take longer to fully carmalize the sugar.  Honestly, it's really not necessary if you use a heavy bottom pan and only turn it to medium heat.
Ready?  Let's get saucy.  I really can't help it.  Bad puns are in my nature.


Tuesday, May 24, 2011

Party Week: A Bunting We Will Go (DIY)

I think that makes terrible pun #784.  :)

So every party needs some party decor.  I knew we were going to be outside, so it had to be durable and easy to set-up.  I've been kind of obsessed with bunting lately, and it seemed like an obvious choice.  I know there are a million (and one) bunting how-to's in blogland, but I'd like to think this one is different for several reasons.  First of all it's made with a combination of paper and fabric and most important it's adjustable!  Because I sewed a tube in each of the flags (as opposed to sewing the flags to a ribbon), they can be spaced to fit whatever space you need.  At the party, my friend actually asked me if I'd pre-measured the pool cabana, because the bunting fit so perfectly.  That made me happy.


AND because they're adjustable you can add or remove flags to spell out different expressions and sayings!  So basically I'm going to create the entire alphabet and use this thing for virtually everything.

A couple of quick notes: I did not hem the edges of my flags.  I used a heavy canvas fabric and want it to fray a little.  I'll probable hem them after a couple of uses though.  The paper flags are about 1" smaller on each side than the fabric flags.  I'm trying to figure out how to upload and allow you guys to download my flag templates, in the event that you're interested in making your own.  Hopefully I'll figure it out soon!  If you've never sewn paper before, don't worry!  It's actually pretty easy.  You can find some of my pointers and tricks here.

And without further adieu, let's make some bunting.

Materials: 1 yard of heavy weight canvas, colorful paper in as many color as you'd like (I used 5), twine, basic sewing equipment.


We're moving into food and drinks starting tomorrow!  I hope everyone enjoyed the DIYs!

Monday, May 23, 2011

Party Week: Invitations and Swizzle Sticks (DIY)

It's party week!  All week, I'll be posting how-to's, recipes, and tips for planning the perfect summer soiree.  Everything is fairly simple and takes less than an hour.  So put on your party hats and let's get started.  Up first: invitations and a super easy swizzle stick DIY!

I'm a big believer in the invitation.  In a world of mass communication and social media, the invitation seems to have fallen by the wayside.  I think they're as important for small gatherings as they are for large ones.  They set the tone of the event and seem to make everything more special.  I always send some kind of invitation to any event I'm hosting.  Sometimes it's an e-vite, which largely does the work for you; sometimes I'll actually mail something; and often I'll create something and send it by email.  

One of my dear friends is leaving Texas for the summer.  She has a clerkship in Nebraska.  "Clerkships" are a pretty big deal in the legal world, and I knew she needed an appropriate going away party to celebrate.  The template for the invite came from Love, Obsess, Inspire and can be downloaded here.  I'd seen it a while ago and was just waiting for the perfect opportunity to use it.  I changed it up a little in Photoshop, but you could just as easily write-in the info, scan, and email it.

And now for the fun part.  I am a sucker for anything cute, even if it's not particularly useful.  I'd seen several adorable swizzle sticks on various wedding blogs and knew they'd be perfect for the party.  And they're somewhat useful for summer time drinks, because they're perfect for swirling around herbs, fruit, ice, and whatever else makes its way into a summer cocktail.  Best of all, they're cheap and easy!


Hope that was easy to understand.  Let me know if you have any questions; I'd be more than happy to help out.  And, in case you were wondering, I've been using these pretty much non-stop.  It's like everyday's a party!
On the docket for tomorrow: quick and easy bunting!
Have a lovely day, and if your weather is anything like mine: good luck staying dry!

Friday, May 20, 2011

Girl Meets Grill: A love Story

I am not the grill master in our household.  Something about fire and my proclivity to injure myself has always held me back, until now.  I decided it was way past time to conquer the grill.  So last weekend I decided to try my hand at something Texas does best: brisket.  This is the story of a girl, her grill, and some delicious brisket.

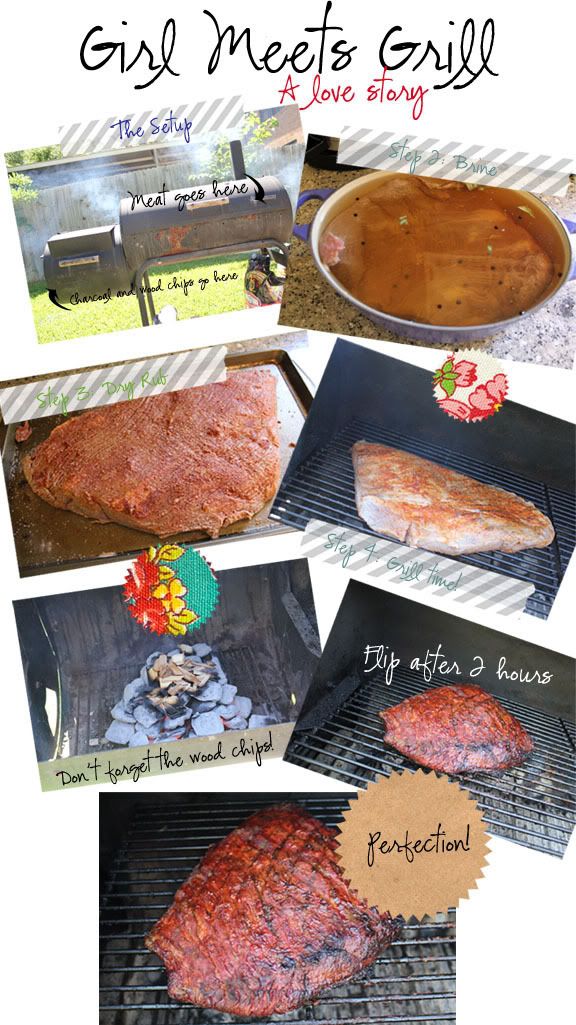
Brisket is notorious for overcooking, so I decided on a 1-2 approach to prevent that.  The first step is smoking, as opposed to direct heat grilling.  When you smoke something, the heat source is located separate from the actual meat.  Indirect heat cooks much slower and at much lower temperatures.  So if you look at the picture above, the charcoal/wood chips are in one area of the grill and the meat is in an entirely different part of the grill.  Step 2 is brining the meat.  Brining allows the meat to soak up a lot more moisture, which offsets the drying-out issue.  I used the Neely's apple cider brining recipe.  Basically you dump apple cider, water, salt, sugar, black peppercorns, bay leaves, and the brisket into a dutch over and let it soak for 3 hours.

Then rub the meat with a dry rub to give it some extra flavor.  I used the dry rub from the same recipe above, with a little bit of cayenne added, because I like an extra kick of heat.  Generously rub down the entire piece of meat (mine was about 5 pounds) with the brisket.

Using a grill thermometer, make sure the grill has reached 275 degrees and place the meat on the grill rack.  Also, clean your grill rack before you put the meat on it.  No one wants to eat the leftover charred bits from your last grilling adventure.  Don't forget to toss some wood chips on the coals to give the meat a nice smoky flavor!  And depending on the type of wood chips you're using, you may need to make a small foil pouch to keep them from catching fire.  I actually ended up doing this.

Flip your meat after about 2 hours and cook on the other side for approximately another hour. After that hour has passed, wrap your brisket in foil and cook for an additional hour.  The foil will further slow down the cooking process and help keep the juices in your brisket.  The brisket is tender when it reaches 200 degrees you can also check with other crazy methods that some people swear by, but I recommend a thermometer.

And no brisket meal is complete without some equal tasty sides.


Use the smoking time to enjoy some fun in the sun...or in my case, work on your law review packet.  But hey, not a bad way to spend a couple of hours.

To accompany the brisket, I served Bobby Flay's lime cumin coleslaw, with several minor changes.  Just use bagged coleslaw mix, and an added half a red onion.  There is no sense in cutting up all of those vegetables when someone else can do it for you.  I also double the amount of the dressing and let it sit for a couple of hours before serving.  I like the extra time to allow all the flavors to marry.  I also always serve "Ranch Style Beans."  By now, I'm sure you all know how much I don't like prepackaged foods. Meet the one exception.  I love these beans.  I have no idea why.  They are pretty much one of my favorite foods- obviously there are 2 cans of beans for 2 people.  Ha.  And yes, I'm embarrassed to admit that.  I also make my own barbeque sauce.  I pretty much make it up as I go, but it here's the basic breakdown.

SummerTime's Barbeque Sauce:
  • 1/4 cup ketchup
  • 3 shakes Worcestershire sauce
  • 2 tablespoons butter
  • 2 tablespoons Grey Poupon
  • 1/2 cup molasses
  • 3 tablespoons apple cider
  • Salt and Pepper
  • 1 tsp. Cayenne pepper.  (It's an addiction, really.)

Instructions:
  • Combine all ingredients in a small sauce pan and heat until warm and butter has melted.  Add salt and pepper to taste.

Memorial Day is coming up, so now's the perfect time to master the grill!
You will not regret it.

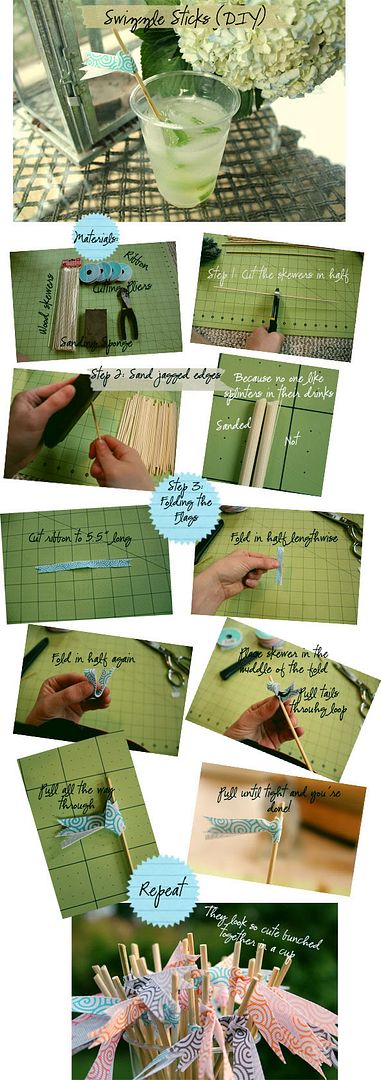
Happy Weekend All!  And stay tuned, because next week it's party central!  I have several DIY's and recipes lined up to help you throw the perfect summer soiree!

Wednesday, May 18, 2011

CCSL gets an update!

I decide it was time to get rid of the overly busy scroll background.  I opted for a much more streamlined look this time around.  The template started out as The Strawberry Shortcake template from Pugly Pixle.  I then did a little Photoshopping (the background was pink) using some free web clips from Pugly Pixle and various other things to settle on the final design.

I'm definitely not a html expert, but thanks to the good 'ole web, I was able to figure everything out pretty quickly.

Hope you like the changes!

Tuesday, May 17, 2011

When it rains...

So yesterday I wrote about how my neighbor's laptop was stolen over the weekend.
Add Jason and I to the club.
Seriously.
Pictures totally unrelated, but they're ones that make me smile.  That's J and I back home for spring break.

Our landlord is replacing the back-door to our apartment.  The guy was supposed to finish on Friday, but ended up coming back Monday.  I walked into my office (where the backdoor is located) and realized, both mine and Jason's laptops were gone- cords and all.

Initially I thought someone had moved them because the room was really dusty.
Until my landlord told me no one had touched them.

And then the terrible realization set in, the guy replacing our door had stolen both of our computers.
And he still had a key.

Sunset on Lake LBJ
The owner of the company came over later that evening.  He initially wanted to claim that we had left our computers somewhere else...is is common to forget where you put your computer?  Unfortunately for the worker, I happen to have a very shiny, very noticeable Mac.  The owner admitted to seeing my computer on my desk, and admitted it was there when he left the worker alone.

Oh and did I mention the worker is a convicted felon?!?  Funny, no one mentioned it to us or my landlords.  I have no idea why anyone thinks it's even remotely ok to leave someone whose criminal records is over 30 pages long, (Yep.  That's right.  I printed it at my office today.) alone in someone's home.

Infuriating.

The maintenance owner initially wanted us to file a claim on our renter's insurance.  Umm, no.  I will not be doing that.  He will be filing a claim on his own insurance or we will be going to court.

The police also think that the worker is responsible for our neighbor's break-in as well.

Horseshoe Bay Lighthouse

Thanks for reading my rant.  I'm trying to keep calm, and remind myself that they're only things; but at the same time I feel completely violated.  Like I found someone snooping through my delicates or going through my medicine cabinet.  It's a really icky feeling when your home doesn't feel safe.  I even moved large objects in front of every door last night, because that guy had a key to our place.  

I'm not sure how long I'll be without a laptop, so I apologize if my posts are somewhat devoid of pictures.  And...given this weekend I haven't even started the wood veneer project, but I promise I'll get to it soon!

Monday, May 16, 2011

An interesting weekend...to say the least.

So after 12 hours of working on my law review packet, Jason and I decided to call it an early night on Saturday.  We were in bed watching t.v. around 10:30 when the dog started growling.
It's not an entirely uncommon thing for him to do, but it always makes me nervous that he hears something that I can't.
Which in this case, was correct.


Shortly after Dolce started growling, we hear two incredibly loud bangs...followed immediately by an alarm.
Horrified I realized it was our downstairs neighbor's house alarm.  (We live in an old home converted into a duplex.)
So I run check the backyard and Jason runs to check the front-yard and what does he see?  Two Hispanic men standing on the side driveway trying to break into our neighbors house.  They saw him and took off running.

So our quiet night turned into a deluge of phone calls: to the police, to our landlord, to our neighbors.
Followed by another round of conversations with the police and our neighbors.

They did manage to actually get into the house and steal their laptop, but things are just things.
No one was injured (including their lab puppy) so that's the important thing.

Dallas is the second most segregated city in the country, with only Chicago being worse.  So you live in a place where people look like you, dress like you, and act like you.  It lulls you into a false sense of security thinking that bad things won't happen in your neighborhood.  However, as Saturday night proved, no area is immune from crime.

I'm incredibly thankful that no one was injured, and that our neighbors only suffered a minor economic loss.  I'm glad that Jason and I were home to help prevent a full scale theft, but wished we could have completely stopped them.  And now I'm a one-man crime stoppers patrol.  :)

Friday, May 13, 2011

It's bird...It's a plane...

It's a big pile of wood veneer!


After failed searches at the local home improvement store, craiglist came to my rescue again.
I am now the proud owner of several random rolls of wood veneer.
And if all goes according to plan, it may just be my best craft project yet!
I'm hoping to have something to show you guys by Monday...but I'm currently in the middle of the law review write on competition so that takes priority.
Fingers crossed...for both!


Also, due to Bloggers freak out yesterday, the lemon pasta post has vanished.
Let me know if you'd like the recipe and I'd be happy to oblige!

Happy Weekend all!

Wednesday, May 11, 2011

Weekday Meals: hummus

Given my hectic and rather dismal posts these last few weeks, I figured I'd do a double week day meal post this time around.  Check back later today for a quick lemon pasta recipe!  And as promised, it does not include salmon.  I made the hummus last Friday for a little post-finals celebration for Jason and myself.  I planned on documenting all of the meal components, but I was so busy in the kitchen {making zeppole, pan frying pork tenderloin, and checking on my polenta to make sure it didn't seize} that my camera never left the counter.  I did manage to get the hummus though.

Hummus is one of my favorite snack foods.  It's very tasty and pretty healthy.  You may not know this about me, but I'm very conscientious about the foods that I put in my body.  I do not like purchasing anything prepackaged, and I'm very leery of things like preservatives, stabilizers, and artificial anything.  So when I found a recipe for homemade hummus I knew I had to give it a whirl...because it goes in the food processor.  Get it?  Oh me and my terrible jokes.

Honestly the hummus recipe is just too easy to not make it at home.  Oh and it's cheaper.  And it's fast.

(I halved the recipe.)


Ingredients:
  • 2 garlic cloves
  • 1 can chickpeas, drained but keep the liquid and add it as well.
  • 3/4 tsp. kosher salt
  • 1/6 cup tahini
  • 3 tbl. lemon juice
  • 4 dashes hot sauce
Directions (and here's the super easy part):
  • Add all of the ingredients into a food processor.  Process until the mixture is smooth.  
  • Serve with pita, crackers, carrots, celery, etc.
Sorry for the lighting in these pictures.  I didn't realize how bad it was until I loaded them on my computer.
I also make a spicy olive oil to drizzle on top.  It's easy too.  Heat a couple tablespoons of olive oil on low heat and a pinch or two of red pepper flakes.  Cook for a couple of minutes until the oil is fragrant, and before the flakes begin to brown.  Allow to cool slightly and drizzle on top of the hummus.


Check back later today for the lemon pasta recipe!

Friday, May 6, 2011

FINALLY!

School's out for the summer!
I am halfway to becoming a lawyer.
Time for some much needed rest and relaxation!


And then it's a full summer of crafts, cooking, and fun!
Thanks for bearing with me these last few weeks.

Tuesday, May 3, 2011

Weekday Meals: Butter Noodles, Summer Style

Remember last week when I said there wasn't anything in my kitchen to eat?
Well it hasn't gotten much better.
My ability to create food out of nothing is improving though.
There may not be gourmet meals coming out of my kitchen, but they're pretty decent considering my non-existent free time.

This little meal is for all of my friends who laughed that I don't consider buttered noodles a meal.  Why settle for just butter when you can add just a few steps and end up with this?


I'm not sure if you call this a recipe, but here's my take on buttered noodles.

Ingredients:
  • Spaghetti pasta
  • Homemade Ricotta-- Ridiculous easy recipe here.
  • Basil leaves (Mine are from my backyard.)
  • Salt and Pepper
  • Olive oil to drizzle
  • Butter
Instructions (if you can call them such)
  • Bring a pot of salter water to boil.  It should be pretty salty; it'll make the noodles taste better in the end.  Add the pasta when the water is boiling.  Cook until al dente and drain.
  • While the pasta cook, make the ricotta cheese.  Seriously.  Don't skip this step.  It'll be finished before the pasta cooks.
  • Chiffonade the basil leaves.
  • Toss the pasta with just a little butter and the basil.  The basil should wilt just slightly.  I usually don't use much butter, because I also use olive oil.  I like the flavor combination...and...olive oil is healthier. 
  • Top with some more basil and the ricotta cheese, drizzle olive oil on top.  Top with sea salt and cracked black pepper.

Much better than plain 'ole buttered noodles and it didn't take any longer.