Thursday, September 29, 2011

Cook Something: Butternut Squash Gnocchi

Ah, fall.  The chill in the air.  The turning of the leaves.  Hot apple cider.  Nights outside by the chiminea. This time of the year conjures such lovely images in my head.


Images that I have to imagine because it's still consistently in the upper 90's here, and today it's supposed to be 100...again.  That aside, mother nature has blessed Dallas with a couple of lovely days, and fittingly the first day of autumn was one of those days.  I was determined to make a perfect fall dinner that night.  I may have been trying to encourage fall to stay around for a while.  So after work I walked to the Whole Food near my house (love that), picked up a couple simple ingredients, and got to work making delicious butternut squash gnocchi.  The recipe is a bit time consuming, though not really difficult, but the end result was definitely worth it.  Pillowy clouds of gnocchi with a slightly sweet taste topped with an herby brown butter sage sauce and some freshly grated parmesan cheese.  Fantastic.


The original recipe calls for using a potato ricer or a food mill.  Do you have a ricer? I don't.  No worries we can achieve the same effect using a colander and a wooden spoon.  

Butternut Squash Gnocchi with Sage Brown Butter Sauce
Adapted from: Bon Appetit 
Ingredients:
  • 1 medium butternut squash
  • 1-2 large Russet potatoes
  • 1 tbs olive oil
  • 3/4 cup grated parmesan
  • 1 large egg, beaten
  • 1 1/2 tsp ground nutmeg
  • 1 tsp salt
  • 1 3/4 cup all-pupose flour
  • 1/2 cup (1 stick of butter
  • 2-3 tbsp fresh sage, chopped
Instructions:
  • Cut the squash in half and scoop out the seeds.  Drizzle olive oil on top of each half and roast in a 400 degree oven until the flesh is soft and scoop-able, about 1 hour.  There will likely be burnt spots on some of the squash.  Not to worry, these just add flavor.  Once soft, scoop the flesh into a food processor and pulse until completely blended and smooth.
  • Boil the potatoes (skin on) until they're softened all the way through.  Allow to cool slightly.  Once they're not super hot (but still warm), push them through the holes of a sturdy metal colander using the back of a wooden spoon.  The skins will stay in the colander and the newly riced potato won't.

  • Scoop the purred butternut squash into a saucepan and cook on medium heat for 5-10 minutes until any liquid evaporates and the mixture thickens.

  • In a bowl mix, 1 cup of purred butternut squash, 2 cups riced potatoes, the egg, the nutmeg, the salt, and the parmesan cheese.  Slowly add the flour and gently knead it to mix.  If your dough is super sticky add additional flour one tablespoon at a time until it is pliable.  Knead until smooth, but don't over knead because it'll cause the gnocchi to be dense instead of lightly and fluffy.  Cut the dough into 8 equal portions.


  • Roll each portion into a 1/2 inch thick rope.  Cut the rope into 3/4 an inch sections.  Using the back of a fork, roll the tines on one side of the gnocchi to make ridges.  If you've never seen gnocchi made before, look up a video on YouTube.  Although they'll still taste great even if not made perfectly. Mine definitely weren't perfect.

  • Put the newly formed gnocchi on a baking sheet and let rest in the refrigerator for at least one hour.  After the hour, drop the gnocchi into a large pot of boiling salted water and cook through.  They begin to float when cooked, but will need to cook additionally after that.  It takes approximately 15-20 minutes for each batch (I did mine in two batches) to cook entirely.
  • While the gnocchi is cooking, heat a heavy bottomed pan on low heat and add the butter.  It will slowly change from yellow to a beautiful golden brown color and will smell all nutty and delicious. Once it's golden brown turn off the heat and add the sage. 
  • Gently mix in the cooked gnocchi with the butter sauce and cook together for a couple minutes to blend flavors.


Top the gnocchi with additional grated parmesan, a sprinkle of salt, some fresh cracked black pepper, and another dash of sage.

And that's it.  Happy Fall!

(And please excuse any grammatical errors.  I'm writing this in a massive hurry...and I only have 10 minutes to get to work!)


Friday, September 23, 2011

Turning Over a New Leaf and Weekday Meals: Sandwich Edition


Happy Autumn!  I'm so excited it's officially autumn.  After the longest and hottest summer in the United States,  I am more than ready for cooler weather.  And along with the season change, I'm changing as well.  For everyone who read my rant yesterday, thank you.  I didn't realized how frustrated I was with things until they started spilling out onto the page.  As justified as I think my frustrations are, they're probably not healthy in the long run.  So starting today, I'm getting my routine back in order and back where I can get my frustrations out before they spill onto the inter web (i.e. in the yoga studio).  I did manage to get some sleep last night so that has helped immensely.  But enough of that...let's finally get back to what I do best...or at least moderately well.

Weekday Meals: Sandwich Edition!
I haven't always loved the sandwich.  Perhaps it's memories of those sad sandwiches you find in school cafeterias.  You know the pieces of white bread, some unidentifiable meat, and a piece of processed cheese sandwhich?  Yeah, it's no wonder I wasn't a huge fun of the sandwich.  But, as it turns out, with a little love and some better ingredients, you can whip up a sandwich that is delicious and filling.  And in case you don't believe a sandwich can make a meal, Jeff Mauro "The Sandwich King" has an entire tv series dedicated to doing just that.  The Food Network really should start paying me for all of the free plugs I give them.  :)

Here's a pretty common line up of what you'll find a one of my sandwiches.  And here are some tips I've gleaned along with way to the perfect sandwich.

Don't use plain-o mayo and mustard.  Total snooze fest.  Branch out a little.  Live it up.  We just started buying the olive oil mayo with cracked black pepper.  Infinitely better than the original.  But don't stop there.  I almost always add some fresh herbs (almost always basil) into my mayo.  Cut a couple leaves up and you won't believe how delicious your mayo will taste.  I also highly recommend stone ground mustard.  It's pretty awesome.

Buy your meat at the deli.  Don't opt for the packaged stuff.  There are so many nitrites and nitrates and preservatives, there's no way it taste like the stuff at the deli.  And if your deli man is as cool as mine, he'll give you some slices to nibble on while you're waiting.  I'm currently obsessed with Kobe beef sandwich slices.  Out of this world delicious.

Get some good bread and some cheese.

Now doesn't that look much tastier than regular ole' mayo?


The perfect sandwich stacking order: bread, meat, cheese, mustard, diced tomatoes, lettuce, bread.  Why do i say this?  It keeps all the wet stuff that could get the bread soggy tucked away in the middle.
Yes, I have considered sandwhich construction this heavily.
Drizzle the top with a little olive oil and sprinkle with some herbs de provence.
Slap that baby on a panini grill and toast until it's lightly brown.


Serve with some fruit and watch as those cafeteria memories fade away.


And although not related to sandwiches, here's the best sous chef a girl could ask for.


Thursday, September 22, 2011

My life these days...

Has been more than a little frustrating.  I am stressed beyond belief at the moment.  Part of it has to do with a case note that I do not have time for research.  Part of it has to do with a cite check that I know is going to come at the most inopportune time (i.e. the week before my case note draft is due, which also happens to be the weekend that I'll be in New Orleans for a weeding).  Part of it has to do with the ungodly stress of the legal job market.  But mainly it has to do with my inability to sleep.

True story: I hate the library.  I never ever study in there.  I feel like the life is being sucked out of me every time I walk in there.  So this is where you'll find me.  In a random lobby with bad lighting and creepy paintings of old people.

Annnnd in the event you're wondering, the "Dispute Concerning Navigational and Related Rights (Costa Rica v. Nicaragua) is the topic of my case note.  Riveting.  And one of the opinions is in French.  Entirely.  I can somewhat read French, but I'm not sure I can read French legalese.  Should be fun.

 For some reason, I've developed a terrible case on insomnia.  Regardless of the fact that I'm exhausted all day, everyday I cannot fall asleep at night.  I lay awake for hours, and when I finally fall asleep I wake up periodically.  I never fully fall asleep until around 7 am, and then it's a mere 3 hours until I absolutely have to be awake.  I spend most of my days with a raging headache and absolutely no energy.  Jay said I looked like I was dragging myself from one responsibility to another.  And it's been going on this way for a month.  I'm constantly on the verge of tears.  Not really because anything is wrong, but because I'm so exhausted that my nerves are 100% completely frazzled.

And it's causing my clumsiness to go way out of control.  Yesterday I head butted the bathtub.  Seriously.  I flipped my head over and flipped it right into the side of our bathtub.  It was pretty funny, aside from the fact that our bathtub is from the 1930's so it's cast iron and ceramic...meaning I basically slammed my head into a giant LeCreuset.  Once we determined I didn't have a concussion, Jay and I did have a good laugh about it.

But it's finally starting to feel like fall, and I can't help but hope that sleep is just around the corner.  Aside from the exhaustion and stress, life is good so I shouldn't complain too much.  I keep trying to remind myself of all the blessings I do have, even when I feel like a mountain of problems are piling up at my door.

If you've read this far, thanks for listening to my rant.  I pinky promise I'll start posting some useful things again soon.  Until then, in case I don't see you, "Good afternoon, good evening, and good night."

Sunday, September 11, 2011

Never Forgotten. Forever Grateful.

"Now we have inscribed a new memory alongside those others.  It's a memory of tragedy and shock, of loss and mourning.  But not only of loss and mourning.  It's also a memory of bravery and self-sacrifice, and the love that lays down its life for a friend- even a friend whose name it never knew." 
-President George W. Bush, December 11, 2001 

To all of those who gave and continue to give their lives defending this country, thank you.
Your sacrifice and service will never be forgotten.


The song is available for purchase on iTunes here, and all proceeds benefit the National Fallen Firefighters Foundation.

Never Forgotten.  Forever Grateful.

Friday, September 2, 2011

Make Something: Screen Printed Towels

Happy Friday!
And to start this looong weekend off right, here's one of my all time favorite projects: screen printing.  Screen printing combines all of my favorite things into one super craft.  I'm pretty smitten with it.
Fair warning: this post is SUPER long.


For ease of explaining, I'm going to split it up into 3 parts: design, preparing the screen, and actually printing.

Part 1: Designing the Screen
The first thing I do when designing anything is to get it on paper.  I'm not a master artist, but I generally figure out what I want simply by scribbling on paper.  The top yellow piece of paper is my very first attempt.  After creating a concept, I found a font that sort of looked like what I wanted but not exactly.  {It's the middle picture in the top, and I cannot for the life of me remember the name of the font.}  I simply used a pen to change the parts I didn't like.  I added flourishes in some places and deleted them in others.  I also moved around some of the letters to make them fit how I wanted them.  I then drew a new page with sharpie and made several copies of it so I wouldn't mess up the original.  Once I was satisfied with that I colored everything in black and scanned it into Photoshop.


If you don't have Photoshop, there's a free product called Gimp that's supposed to be similar to Photoshop.  You can also download a free 30 day Photoshop trial.  And if you're in school, check your school's computer department because you can often buy software at discounted prices.  That's how I bought mine.  I got an entire Adobe package for $300, when Photoshop alone costs double that.

Once in Photoshop I simply colored in all of the words to make them completely black.  You'd be surprised what you miss with a marker.

On the left is the finished version and the right is the original scan.  And I used the same screen to make 2 different sets of towels...in case you were thinking it didn't really make sense right now.
Since the Lake LBJ part was curly and whimsical, I wanted to contrast that with a very straight and clean font for the other words.  I used "Champagne and Limousines" It's a free font and can we downloaded here.  And it's pretty awesome.  I then just moved the words around until I was happy with the placement.  A word to the wise with Photoshop: turn on the smart guides.  They're make lining everything up so much easier.

Print the design out on a transparency.  Print 2 copies, because you want the black parts to be completely black.  I simply ordered it on Fed-Ex and picked it up 20 minutes later.  It only cost like $1.50  Tape the sheets together so they don't slide apart.


Step 2: Prepare the Screen
Time to prepare the screen.  You're going to need a screen printing kit, like this one from Speedball.  I purchased mine at Michael's.  It was supposed to be around $60, but I used a 40% of coupon.  I know that's kind of steep for a craft project, but it's SO worth it.  

Please ignore my the mess in background.  I may have fallen asleep on the futon in my office a couple of nights this week.


DON'T read the instructions that come with the kit.  They're super confusing and pretty intimidating.  Instead read this tutorial from Lil Blue Boo.  It's the best one I've ever found.  It's so thorough that I can't really contribute anything meaningful to it.

But here are a couple tips from me.  The kit comes with 3 tubs of paint and 4 bottles of stuff and then a teeny tiny bottle.  Ignore all of the bottles except this one.  

Take the tiny bottle and fill it halfway with water.  This is the sensitizer.  Using a paintbrush swirl all of the dried stuff into the water.  You need to get all of the sensitizer out, because it's what reacts with the light.  Dump the sensitizer mix into the Photo Emulsion bottles (above) and thoroughly mix.  The Photo Emulsion will start out blue and will end up "slime green" as Ashely explains in her tutorial.

Keep following her tutorial.  Spread the green goo all over your screen in a nice even layer and let dry.

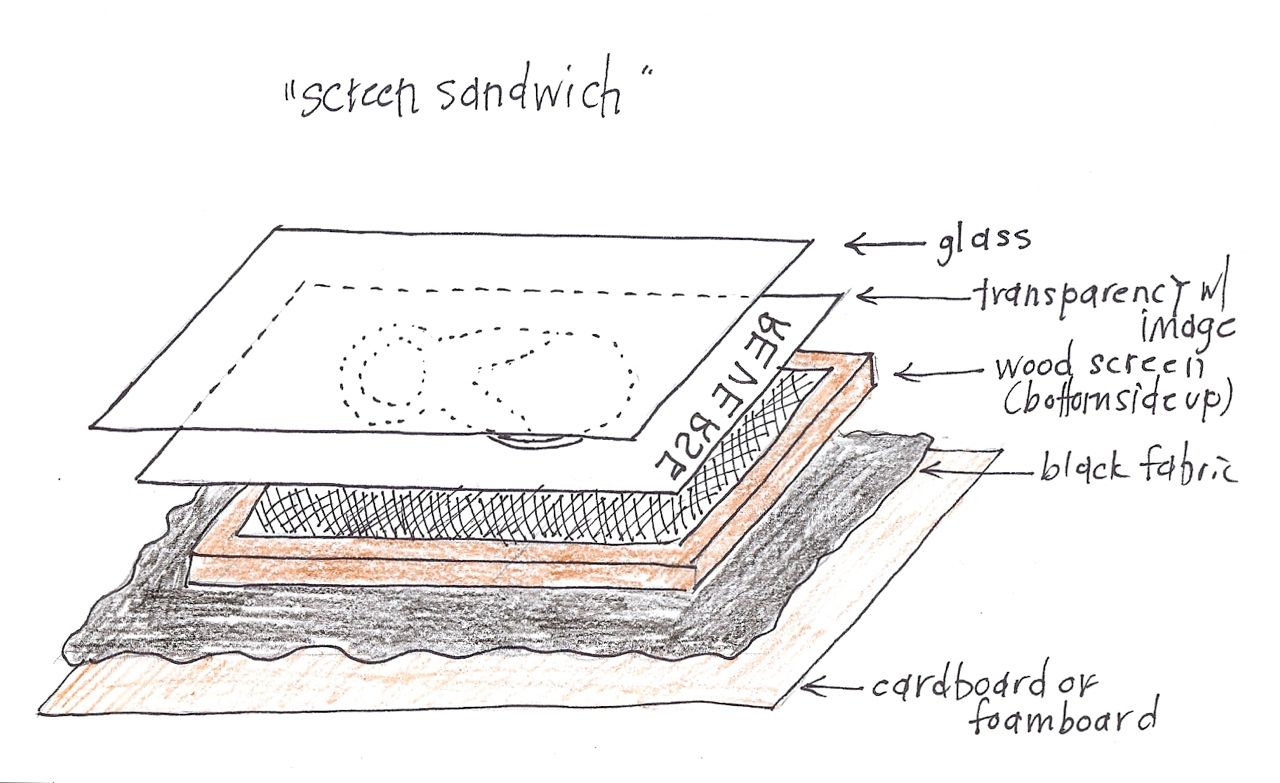
Once your screen is dry, it's time to expose it to sunlight.  Assemble what Ashley calls the "screen sandwich."

Photo from Little Blue Boo


Keep it covered until you get outside and then uncover it.  The green part will start to turn a gray color, which is correct.  The black parts of the transparency will keep the words from graying.  The graying is basically baking the green stuff onto the screen.  Read her instructions for a better description and how to know when to stop exposing.  It only took me about 2 minutes for my screen to expose.

Take your screen inside and put it in the sink.  Spray it.  After a couple of minutes the parts where the letters were will begin to wash away.  It's a pretty awesome experience.  Keep spraying until you get all of the green goo off the screen.  The gray part won't wash away.  This is what your screen will look like when you hold it up to the light:

The part where the light shines through is where the paint will go through.
Congrats!  You've just made a screen!

Step 3: Painting
Alright, this is the easy part.

Use painters tape to tape around the edges.  This will keep paint from leaking through the edges, which probably aren't 100% blocked (at least mine weren't).  Also, if you're using your screen for double purposes like I was or you want to use multiple colors, simply tape off the parts you don't want to use then.  So I taped off the "Est" and the "K&L Simmons."  I used those words for some towels I made for a wedding gift.

Simply lay whatever you're going to paint face up on a piece of cardboard.  The cardboard provides stability and keeps paint from bleeding through.  Iron the fabric before trying to paint.  Otherwise your words will not paint evenly.  {Ask me how I know this.}


Add a small amount of paint at the top of the screen.  And use the spreader thing to spread the paint across the screen.  Go back and forth a couple of times to make sure you didn't miss any spots.


Remove the screen and viola!  Your own screen printed creation!

I recommend doing a couple of practice runs with some scrap fabric before using your final fabric.  Just in case.  :)
And this is why you use the cardboard:


I used them to wrap the gifts for our group birthday party.  


That's really all there is to it.  It's seriously my new favorite thing.  Even Jason is smitten with the idea of screen printing.  He has me lined up to create about 5 different t-shirts for him.

Let me know if you have any questions!  And again, go check out Ashley's post on it.  She does a fantastic job explaining the entire process.  I kept her post on my computer the first time so I could easily refer to it during the process.

Have a safe and happy Labor Day!  I'm off to soak up some rays {and read about oil and gas} at the above mentioned lake!  And thanks so much for all of the sweet comments yesterday!  They made me smile knowing I'm not alone in the whirlwind of law school!

Thursday, September 1, 2011

Oh School.

Hey everyone.  In case you were wondering, I am still alive.  I know I've completely fallen out of the blog world.  Make that internet world.  Actually make that all the world that doesn't involve school.

Insert me back here.  Side note- this awesome photo opp. came from a casualty between my swimsuit top and Woodrow's paws.  I jumped off the front of the boat and he jumped in after to "save me."  All was great until I was trying to lift him onto the boat's platform- not easy to tread water and lift a 100 lb. lab.  Well he stepped on my chest and completely snapped the tie to my swimsuit off hence why I'm modeling the fashionable t-shirt and towel lake attire.
I completely switched up my schedule this semester, and it's been a bit of an adjustment.  I'm working12-5 now and going to class from 6-10.  I feel like my days are lopsided.  They're very very weighted on the later part of the day.  So much so that when I get home from school at 10 pm I'm still so hopped up on excessive amounts of coffee adrenaline that I haven't been falling asleep until after 1 am.  Then I sleep until almost 10, which leaves a very small window of time to play around on the internet, particularly when I should be spending all of my extra time picking a case note topic for law review.  It's due in a measly 8 days.  On a brighter note, I'm really digging most of my classes this semester.

I am determined to get my schedule on some sort of a pattern, which hopefully will include time for some yoga.  I haven't been in over a month. 

Tomorrow I'll be posting a how-to on creating this awesome hand towel.    I used them to wrap gifts I gave everyone for a our big lake trip and birthday celebration.  Screen printing may be my new favorite craft.  It's pretty flipping awesome.  Even the boy likes it.


Have a great day!