
I have previously mentioned how much I love pillowcases. I change them all the time. They are a quick, easy, and fairly cheap way of completely changing the feel of a room. Envelope pillow cases are probably the easiest pillowcases of all to sew, and because they only require sewing in a straight line, they're a perfect beginner pillow. In fact, the pillow cases that I removed from these pillows were the very first thing I ever sewed. One day, I just decided I need to sew. So I borrowed a sewing machine from my then 12 year old cousin, watched some Youtube videos {seriously}, a couple of hours and several swear words later they were finished. They weren't the prettiest things ever, and it's fairly ridiculous they've been on my bed for as long as they have...about 4 years.
Any hoo, I'm finally working on redecorating my bedroom. It's always the last room I ever tackle, and honestly it's never been fully completed to my liking. Hereto, it's been an odd assortment of things. The main problem is that I've never had any piece anchoring the room, so I've been vainly searching for things that match pieces I already have. It's never going to happen. So when I stumbled upon this fabric online {from Joann's}, I knew it would be perfect to anchor my whole bedroom. It has enough color and interest that I can pull all sorts of things from it. I'm pretty much in love with it.
Side note about the fabric- I looks super green on the website, but it's actually a bunch of grays, blacks, and tans. There isn't any green at all. Just an FYI, when you're purchasing fabric online, sight unseen.

To construct the pillowcase you're going to need 3 separate fabric panels. Here's the easiest way to figure out the size of panels you need. Take the overall dimensions of your pillow (mine was 20" x 20") and add an inch to both sides (so mine is now 21" x 21"). This will ensure that your pillowcase is snug on your pillow, while giving you a 1/2" seam allowance.
For the back panels, you want them together to be 1 1/2 the length of the front panel. I find it's easier to make one large panel and then cut it in half. So for mine 21x1.5= 31.5 and 31.5/2= 15.75. Therefore, each of the back panels will be 21"x15.75". You want the back panels to overlap enough so that they don't gap once the pillow is inserted and making each panel 3/4 of the total length ensures this.

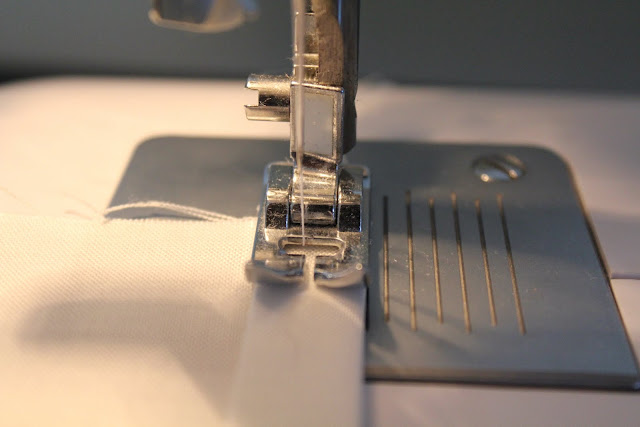
The first step is to hem the smaller panels. Hem them on the 21" side. One panel edge will be exposed and one will be hidden. For the exposed panel, fold it down 1/2" iron and fold down again and iron. Sew alongside the folded seam using a straight stitch.


Once you get back to the beginning, clip the corners close to the stitches. Be careful not to actually cut them though. Flip your pillow right side to. Use either your fingers or a chopstick (depending on the size of your corners), to poke the corners out so they're nice and pointy.


Any hoo, I'm finally working on redecorating my bedroom. It's always the last room I ever tackle, and honestly it's never been fully completed to my liking. Hereto, it's been an odd assortment of things. The main problem is that I've never had any piece anchoring the room, so I've been vainly searching for things that match pieces I already have. It's never going to happen. So when I stumbled upon this fabric online {from Joann's}, I knew it would be perfect to anchor my whole bedroom. It has enough color and interest that I can pull all sorts of things from it. I'm pretty much in love with it.
Side note about the fabric- I looks super green on the website, but it's actually a bunch of grays, blacks, and tans. There isn't any green at all. Just an FYI, when you're purchasing fabric online, sight unseen.
And that lovely yellow chair is the "big ugly chair"...and is one of my MUST do projects this summer. It's SOO ugly but SOO comfy and it's the perfect chair to study in. I've decide it can stay so long as I figure out a way to make it prettier.

To construct the pillowcase you're going to need 3 separate fabric panels. Here's the easiest way to figure out the size of panels you need. Take the overall dimensions of your pillow (mine was 20" x 20") and add an inch to both sides (so mine is now 21" x 21"). This will ensure that your pillowcase is snug on your pillow, while giving you a 1/2" seam allowance.
For the back panels, you want them together to be 1 1/2 the length of the front panel. I find it's easier to make one large panel and then cut it in half. So for mine 21x1.5= 31.5 and 31.5/2= 15.75. Therefore, each of the back panels will be 21"x15.75". You want the back panels to overlap enough so that they don't gap once the pillow is inserted and making each panel 3/4 of the total length ensures this.

The first step is to hem the smaller panels. Hem them on the 21" side. One panel edge will be exposed and one will be hidden. For the exposed panel, fold it down 1/2" iron and fold down again and iron. Sew alongside the folded seam using a straight stitch.


For the panel that will be hidden, there really isn't any reason to actually hem it. However, you want to do something to keep the edges from fraying. Sew a small zig-zag stitch close to the fabric edge. That'll keep those nasty frayed edges from messing up your lovely pillow.
And admittedly, I should have sewn closer to the fabric edge.

Assembly time! Don't look so surprised! I told you these were easy peasy!
Ok so here's how you stack the panels. {I tried to upload a drawing of this, but my scanner was being dumb.} Lay the front panel right side up with the hemmed side facing the center of the pillow. {And in case you're not a sewer, the "right side" is the pretty side. It's the side without any ugly stitches, etc.} Lay the panel with the hemmed edge on top of this. You want to put the nice side of the hem facing the right side of the front panel. See picture if confused.

Lastly, lay the last panel down. It really doesn't matter which way, just so long as the zig-zag side faces the center of the pillow. Line up all of the outer seams and pin around the edges.

Sew around all of the sides keeping a 1/2 seam allowance. Back stitch once you get all the way back to the beginning. Ever wonder how people get fabulous corners on their pillows? Well, you're in luck! I'm going to tell you. The key is to keep stitching around every corner, instead of stopping and cutting your thread at each corner. So how do you do that? When you have 1/2 inch left to sew on a side STOP. Make sure your needle is DOWN and pick up your presser foot. Turn the entire piece of fabric to the next side. Lower your presser food and continue stitching. Simple as that.


Once you get back to the beginning, clip the corners close to the stitches. Be careful not to actually cut them though. Flip your pillow right side to. Use either your fingers or a chopstick (depending on the size of your corners), to poke the corners out so they're nice and pointy.


Stuff with pillow and you're done! Repeat for as many pillowcases as you need!

Happy Weekend lovelies!
2 comments:
Such a great detailed tutorial! I think that's awesome that you taught yourself, those pillows look amazing!
Thanks for your law school tips on my blog. I loved them all, esp the one about trusting yourself!
Post a Comment