Showing posts with label holidays. Show all posts

Wednesday, July 2, 2014

Make Something: Dog Bow-Tie Collars (Patriotic Edition)


The Fourth of July is just around the corner and if you're anything like me your 4th is spent wearing as much patriotic garb as possible.  This year I decided that my dogs needed to join the 4th of July festivities and made them each bow-tie collars to show their American pride this week.


*Dolce probably will not be wearing his much, because you can't really see it with his fur.  Instead I made him a matching bandana that you can actually see.  Both collars took about an hour and a half to make, with the bulk of the time spent figuring out how to re-thread the collar and forcing the collar through the plastic pieces.  I gained some speed when I reassembled Dolce's because I used pliers to do most of the pulling, which made the process much much easier.

Materials:
  • Dog collars, disassembled and pieces reserved (alternatively you could individually buy all of the pieces)
  • Double side interfacing (which means it is sticky on both sides)
  • Felt lined single sided interfacing
  • Basic sewing supplies


Instructions: 
  • One quick note about disassembling the collar: I left one end as it was, because it was seriously glued down and I didn't feel like trying to pry it apart.  This also had the added benefit of me not having to stitch that side down again.  Take pictures of your collar before you disassemble it.  I ended up using an extra one of Dolce's to help me put it back together.
  • Cut your fabric to the length and slightly  more than twice the width of the finished collar.  Yogi's collar in an inch wide so I cut the fabric to 2.5 inches. 

  • Cut the double sided interfacing to the same width as your fabric.   Carefully peel off the paper side not the wax side!  If you peel of the wax side and iron it down the paper side will not peel off.
  • Lay the interfacing with the wax side facing up on the wrong side of the fabric and iron on high for 10-15 seconds.  Let cool for a minute and remove the wax paper.  If you've done it correctly the paper will remove easily, the interfacing will have adhered to the fabric, and what is left will be very sticky to the touch.


  • Fold the ends of the fabric in to finish the edges.  I also recommend added an extra piece of double sided interfacing to make sure the ends adhere to the collar.

  • Carefully fold the fabric over the collar.  Do this slowly so it stays even and smooth.  Once you are satisfied with the placement iron the heck out of the fabric and collar.


  • The fabric will permanently bond to the collar.  It's kind of crazy because aside from the ends you can't tell it wasn't constructed like that in the first place. 


Bow Tie Creation

  • To create the bow ties I used the very precise method of cutting various shapes and sizes of rectangles and holding them up to my dogs' necks until I was happy with the size.  
  • Once you've determined how big you want the bow tie cut two equal size rectangles.
  • Cut a piece of felt sided interfacing that is about 1/4" smaller than the fabric.  Iron this to the wrong side of one of the rectangles.  Do not skip this step.  You need the interfacing to give the bow tie some body and help it retain its shape.
  • Sew both pieces of the bow tie together, right sides facing.  Leave a small section unstitched to turn right side to.  Use a pointed object (I use chopsticks) to push out the corners.  Iron flat and either stitch the opening closed or seal with some double sided interfacing (I'm lazy so I went the later route).


  • Sew a small tube the width of the collar.


  • Fold the finished bow tie in an accordion shape and slip the middle loop over the folds.


  • Finally collar reassembling. If you start with the finished end like I did (see above) you will add the bow tie after you have finished the part of the collar that allows you to adjust the width and right before you re-attach the D-ring and the female end of the clasp.  This will keep the bow tie between the two "mechanical" pieces of the collar and pretty much dead center.
  • Once the collar is reassembled sew the tail down using a heavy duty thread and needled.  Back stitch in several places to ensure it is properly tacked down.
  • Sorry I don't have any pictures of the reassembling.  It's the most frustrating part of the entire process and honestly you can't tell what's going on from photos.  Keep a collar handy and you'll figure it out!
And lastly....show off your patriotic dogs!


Monday, December 23, 2013

Cook Something: Spiked Hot Chocolate and Homemade Churros

For a perfectly cozy evening or a late night Christmas treat, I highly recommend some steamy hot chocolate and homemade churros.I made these a couple Fridays ago on a particularly dreary and frigid night and they were the perfect way to spend the evening.


The churro batter is very similar to a French pate a choux, albeit thicker.  Making churros is a lot less intimating than it sounds, but a couple words of advice. Watch the temperature of your oil.  If your oil gets too hot your churros will burn before cooking on the inside.  If the oil is too cool, your churros will be greasy.  Use a thermometer and keep your oil as close to 350 as you can.  Secondly, invest the $8 in a pastry bag.  Most recipes will say you can use a gallon bag with the corner snipped off.  This. Is. A. Lie.  This batter is thick.  If you try to squeeze it out of a gallon bag the bag will split open and you're going to end up with a huge mess all over your counter.  I bought my pastry bag at Michael's of all places, but you can find them at any kitchen wares store and possibly Walmart (if your Walmart has a cake decorating section).


For the hot chocolate, I used this recipe and to be honest I didn't love it, especially because it required a decent amount of work.  Whatever hot chocolate you decide to use make sure it's super thick and decadent.


Churros
Adapted from here.
Ingredients:

  • 8 cups vegetable oil or other frying oil
  • 1 cup sugar and 1 tablespoon ground cinnamon.  Mix together in a gallon size ziploc bag and set aside
  • 1 tablespoon sugar
  • 2 cups milk, at room temperature*
  • 4 tablespoons unsalted butter, cut into cubes
  • 1 tsp salt
  • 1 stick cinnamon
  • 2 tsp ground nutmeg
  • 2 cups all purpose flour
  • 3 large eggs, at room temperature*
*To bring to room temperature quickly, microwave the milk in 30 second bursts.  Be careful the milk doesn't scald.  Place the eggs in a bowl of warm water for 5-10 minutes.

Instructions:
  • Add oil to a heavy bottomed pot and bring to 350 degrees.  I prefer using my LeCreuset dutch oven for frying.
  • Bring milk, butter, salt, remaining 1 tablespoon of sugar, cinnamon stick, vanilla, and nutmeg to boil on medium-high heat in a large saucepan.  Turn off heat once boiling and allow to stand for 10 minutes so the flavors infuse in the milk.
  • Discard the cinnamon stick.  Bring the mixture back up to a boil then add the flour and beat vigorously with a wooden spoon until a smooth dough forms.  This is going to take a bit of muscle.
  • Transfer dough to a large bowl and allow the mixture to cool for 5 minutes, stir periodically to help with the cooling.  Add eggs, one at a time, beating until fully incorporated before add the next egg.  
    • If you do this by hand there will be a moment when you think everything has gone terribly wrong.  The dough will somehow look curdled.  Fear not!  Just keeping beating and like magic the dough will transfer back to a homogenous mixture.
  • Insert a star tip into the pastry bag and add the dough into the pastry bag.  I like to use a chip clip to close the top of the bag to prevent any of the dough from squeezing out the back.
  • Pipe the dough into the hot oil in 4-6 inch long pieces.  Pinch the dough of with your fingers or snip with scissors.  Fry up to 6 churros at a time for 3-4 minutes until a beautiful golden brown.
  • Quickly roll the cooked churros on a paper towel and then toss in the bag filled with the cinnamon and sugar mixture.
Enjoy while warm!

Merriest of Christmases to those of you who celebrate!


Tuesday, November 26, 2013

Friendsgiving 2

This past weekend Jason and I hosted our 2nd Annual Friendsgiving.  If you remember from last year, we hosted the inaugural Friendsgiving outside, and I had every intention of doing so again this year.  Mother Nature, however, had very different plans.  It was cold in Texas this past weekend, very very cold, especially for Texas.  So Jason and I had no choice but to move Friendsgiving inside.  We are fortunate enough that by clearing every. last. piece of furniture out of our living room and dining room that we had just enough room to fit the 26 people who had RSVP'd for the event.  We were fairly concerned about space, and although it may have been a little snug, it was a perfectly cozy way to spend a very dreary and frigid night.

So without further ado, the details from Friendsgiving 2.

I was adamant about using real plates and silverware this year.  I picked up the plates from the Dollar Tree (for a $1 a piece, which is crazy because I actually like them more than my actual plates) and the silverware was leftover from my sister's graduation party.

Jason rented tables and chairs from our trusty rental place and I decorated each table with strands of bittersweet and white candles.


Each table setting had a mini-pumpkin pie thank you gift that I made (completely from scratch, crust and all, which is kind of big deal because I am certainly no baker).  Friendsgiving is a party that requires you to bring food, so I wanted to thank everyone for taking the time to make and attend the party and to thank all of the great friends we have in our life.  Thanksgiving so often gets overlooked and I particularly love this event, because it's simply a chance to say thank you to everyone who helps enrich our lives.

I downloaded the "thank you" calligraphy from here and sized it down in Photoshop to about 3"x2".


For beverages I made spiked apple cider and unsweet tea.  And everyone brought beer and wine to share.

Jason and I were fairly concerned about squeezing 26 people into our 1200 square foot apartment.  We knew in advance that the tables and chairs would fit, because we did the same thing for my graduation party, but that party maxed out around 20 people and we had a solid 6 more coming to Friendsgiving.


My idea to help work with traffic flow was to create a "photo booth" in this weird area that connects every room in our house, but isn't really a room itself.  It's kind of like a foyer, but smack dab in the middle.  I decided to set my camera up on a tripod and let people take pictures in front of a backdrop of streamers that I saved from my mother's fiesta party.  The lighting wasn't great in that room, and I'm working on fixing the white balance.


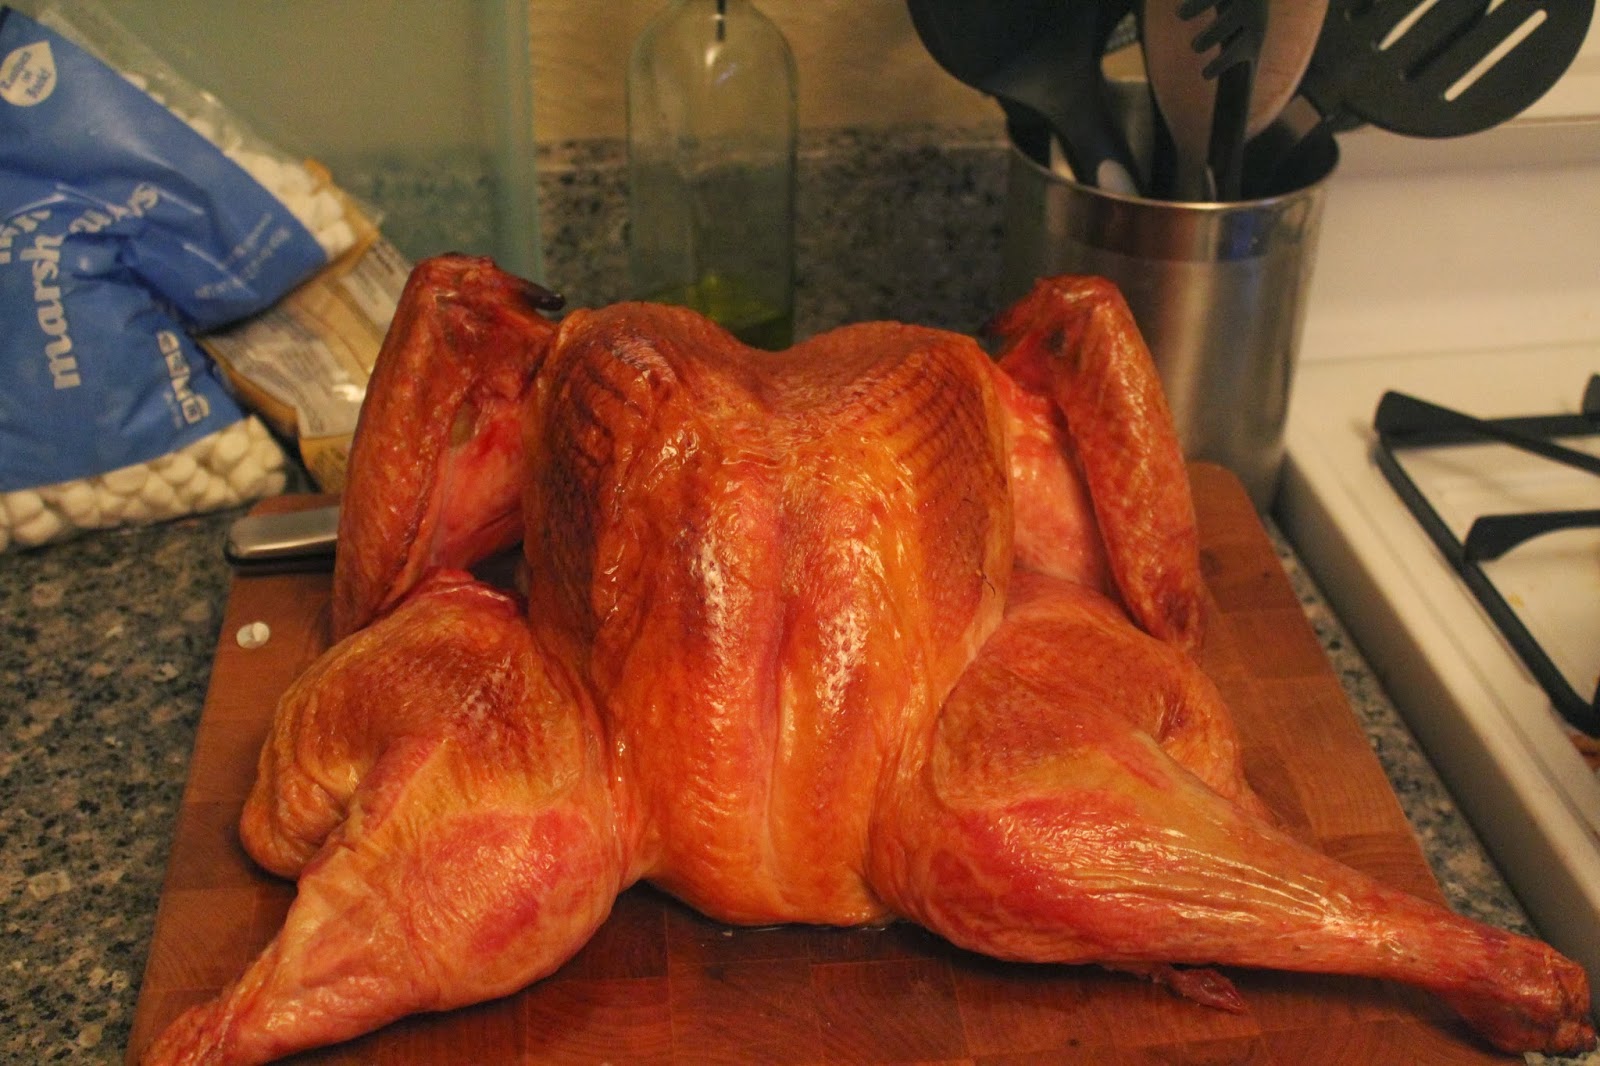
I spatchedcocked the turkey again, using Kenji's method.  This is my second year doing this and I firmly maintain it is the easiest, fastest, and most full proof method of cooking a turkey.

Me shaking "Bertha's" wing.  Yes, I named the turkey.

And this is what you get.  A house full of good food and better friends.  A pretty enjoyable way to spend an evening.

And me the next morning...thinking about how much clean up I had to do.
*Thanks to Tiffany and Keith for the awesome mug.*


I hope everyone has a safe and Happy Thanksgiving!  And a huge thanks to everyone who helped make Friendsgiving a success!

Monday, November 19, 2012

Friendsgiving: Recipes, Crafts, and More

This past weekend Jason and I hosted "Friendsgiving" at our place.  We invited a bunch of friends over, asked everyone to bring a side, and Jason and I cooked the turkey.  We had such a blast.  I'm pretty sure friends, food, and {controlled} fire is pretty much the recipe for a great evening.


I picked up a smoked and glazed ham from Central Market, and roasted my very first turkey.  And not to brag, but that turkey was pretty delicious.  I spatchcocked the turkey using this tutorial from Serious Eats.  Spatchcocking {I won't judge you if that makes you giggle} basically boils down to removing the backbone from the turkey and cooking it flat.  The benefits?  The turkey cooks evenly so the dark meat comes to temp at the exact time as the breast meat.  You're almost guaranteed a perfectly moist turkey.  The turkey also cooks way faster.  My bird was finished in just around 70 minutes, as opposed to 4 hours. And in case you're wondering, I dry brined the turkey for a little less than 48 hours to help ensure some tasty, crispy skin.

I also made this stuffing, which may have been the most delicious stuffing ever.  I substituted the bread for cornbread, because I'm from Texas and we eat cornbread stuffing.


That's all the pictures I have of the food, because I was too busy stuffing my face to take pictures.

A because it's not a party without some decorations, here's are snippets of things I created for the party. I have all the pdfs of the downloadable type things, if anyone is interested, I'd be more than happy to send you the documents.  Honestly, I'd just post them, but I can't remember how to load pdfs and I don't really have the time to figure it out.

Demonstrating my new calligraphy skills.  I'm not a pro yet, but I do like it.  After penning the phrase, I scanned it into Photoshop, cleaned it up, and prepared it for printing.


I made the signs in Photoshop.  I printed them on burlap using the freezer paper transfer process.  Adorable and seriously were super easy.


For the table centerpieces I used my trustee mason jars that I filled with acorns and a pumpkin spice candle.  One word of advice about using acorns, they need to baked for around 2 hours at 175 to kill anything that may be living inside.  I wrapped the jars in burlap and tied a raffia bow around the center.


 I decorated the rest of the table using various foliage I found around my yard.  Other than the gourds and the candles, I didn't pay a single cent for any of the decorations.


I think I may have found a new tradition.  :)


Thursday, May 10, 2012

Cook Something: Brunch and Easter Dinner

I don't want to talk much about the specific details of this brunch or the rest of the day.  Suffice it to say that it was a lovely day for Jason, Dolce, Roy, and myself and I'm very thankful that our last day together was so special.


Moving along...I love brunch.  Love it.  It is my absolute favorite meal.  I mean, when else can you eat sweet food, savory food, and drink libations before noon without being judged?  Winner.

The key to a good brunch is to balance foods you have to prepare/cook with those you do not.  For this brunch, the only thing I actually cooked was the asparagus tart.  I simply laid the "lox, stock, and berries" {you know you missed the bad puns} in a pretty arrangement on a platter.  After that it was simply a matter of pouring the coffee and blood orange soda {for mimosas} into pretty containers.


Asparagus Gruyere Tart - Thank you Martha.  Super easy and very tasty.  I would recommend cutting it in much smaller pieces than she suggests.  It was kind of difficult to bite the large pieces.


"Lox, Stock, and Berries" - strawberries, brie, blackberries, smoked salmon topped with capers, fresh sliced baguette, and cream cheese

Beverages- ice coffee and blood orange mimosas.  

Easter Dinner:


Onion Souffle - probably the most delicious thing I have eaten in a long time.
Sous vide lamb, with a mustard thyme glaze.  If you have no idea what "sous vide" is stay tuned, I'll be singing its many many praises soon.
Yeast Rolls - not pictured
Pecan Peas - you can almost see them behind the candle.

 Easter Dessert:

Lemon Cream Butter Cake - This was absolutely heavenly


 Perfect meals for a perfect day.


Thursday, December 22, 2011

And finally...gifts for neighbors, bosses, mother in laws, or anyone that like sweets!

My Christmas preparation marathon is finally coming to an end.  It's been a jam packed week, but I'm always one to enjoy spending time cooking and crafting.

Last up in my "gift" series are these tasty clementine macaroons with a creamy citrus filling.


The cookies are basically meringue so they're light and airy with a delicious crisp.  You can find the recipe here, and some cute labels for packaging them here.

The cookies are very sweet but light enough that they're not cloying or overpowering.  The acid from the citrus also helps mellow the sweetness factor.

They're gluten free, so they're a great dessert for people who cannot eat gluten and may inadvertently be left out of Christmas desserts.


I hope my gift ideas have given you some sort of inspiration for last minute holiday planning.  I have my holiday party at work today... Hello Charlie Palmer!...and then it's off to the Lake and Houston for our various Christmases.  

Whatever holiday you're celebrating, I hope it's filled with happiness and joy.
And from my little family to yours:

Merry Christmas!

Happy Hanukah!

Happy Kwanzaa!

Happy Festivus!


Wednesday, December 21, 2011

Gifts for the Pups and Christmas Wrapping 2011


 And because we can't forget the furry friends in your life, today we have homemade dog treats.
I pretty much followed the recipe here.  It makes a pretty big batch of dog treats, but I needed to make 2 batches to feed the large number of labs (5) in my life.  I used the gingerbread men for the big dogs and a variety of small Christmas cutouts for the smaller dogs. 


A couple tips, use the lowest sodium you can for all of the ingredients.  Salt isn't great for dogs.  I found some random brand of peanut butter that didn't contain any sodium or sugar.  You're going to blow the salt count on the beef stock and the beef bouillon granules, but try to find the lowest sodium brands you can.  The Swanson brand of beef stock had over 4x the amount of sodium than the brand I ended up buying.
Morale: read the label!

Also, I used demerara sugar (aka Sugar in the Raw) instead of processed white sugar.  I figured natural is always better.


And no Christmas gift is complete without cute packaging!  I found these awesome labels at Creature Comforts (one of  my favorite blogs) and knew they'd be perfect.  I added my own wording and then printed them out on white card stock.  A white paper bag and a raffia bow and they're all set to go!


And finally, if you've been following this blog since last year, you know how much I love Christmas wrapping.  I scheme for a good couple of months about how I want to wrap my gifts.  And although I've used brown craft paper for the last 3 years (I'm not sure I'll ever use anything else), I keep finding little ways to change it up.


This year I attached a silver ribbon to each box.


 Then I created a darker silver tag that reads, "Merry Christmas.  Love, Jason and Summer".
In the center of each tag is a white clay medallion that has Merry Christmas and the person's named stamped onto it.  They're kind of hard to read in the photos, but they are darling in person.


This may be my favorite wrapping scheme ever.