Friday, January 21, 2011

Taking stock of stock


I use chicken stock.  Correction, I use a lot of chicken stock.  Actually, stock is the only thing you can guarantee will always be in my house.  I may not have bread, butter, or milk, but I will always have some stock laying around.  You know at the end of Julie and Julia when she places the box of butter by Julia's picture?  Well if that were me it would be some chicken stock (and butter).  And up until this weekend it was always boxed stock from the grocery store, but the times have changed my friends.


Chances are if you watch many cooking shows (I'm looking at you Barefoot Contessa), you've heard them mention something about the superiority of home cooked stock to its grocery store counterparts.  And if you're anything like me you think something along the lines of, "Yeah yeah yeah.  Homemade stock is much better.  We get it.  However, some of us don't have that kind of time."  But that's where I was wrong.  (Write that down; I don't say it very often.)

Here's the beauty of making chicken stock.  You simply keep the "trash" pieces of various vegetables and chicken bones in a gallon bag in the freezer.  Then when you fill up the bag you simply add water and simmer the heck out of them.  Because chicken stock is made with very common kitchen ingredients, it's really just a simple way of recycling what would otherwise be trash.

A misconception about making stock is that its difficult.  False.  Stock does require a long time to cook- I let mine simmer for about 7 hours-  but after the first 1/2 hour you can basically ignore it, except for stirring every hour or so.  If you have any Lazy Sundays on the horizon, it's the perfect time to let a pot of happiness simmer away on the stove all day.  And did I forget to mention how fantastic it made my entire house smell?

You can find detailed and specific recipes elsewhere on the internet, but I kind of like the "kitchen sink" approach.  The only thing I read that's important is keeping about a half/half ratio between your vegetables and your bones.  I also had some duck bones in there this time leftover from a recent and oh so delicious duck dinner.  Roughly chop whatever you decide to use and cover about 1 inch with water.  Simmer away.  I think you could get away with as few as 3-4 hours or anywhere up to 8.  Ideally you want to cook the bones to the point that you can crush them and release the gelatinous marrow, which adds a velvety texture to foods that just can't be recreated using the processed stuff.

My ingredients included:

  • celery
  • an entire onion roughly chopped with the skins still on
  • 3 large carrots roughly chopped
  • Fresh thyme and oregano (I use the term fresh loosely, since it was actually once fresh herbs that had started to wilt, so I threw them in the freezer bag too.)
  • Chicken and duck bones
  • Whole peppercorns and whole cloves
  • Water to cover
In the beginning...there was vegetables, water and chicken bones.

Hour 1
Hour 3
Hour 5
Hour 7
Once you stock has finished simmering, pour it into a colander with a bowl underneath to drain out all of the liquids from the solids.  Drain again through a cheesecloth to remove the remaining pieces.


Homemade stock doesn't keep long very well in the fridge, you know the whole no preservatives thing.  Now you may be thinking I'm crazy for spending 7 hours cooking something that's going to go bad in like a week.  And that's where you'd be wrong.  (You don't need to write that one down.)  You can preserve this liquid happiness simply by freezing, where it'll stay good for about 2-3 months, although I'm not expecting it to last more than 3 weeks in my household.  See earlier comments about my love of stock.  However, I froze it in ice cube trays so thawing it will be a snap, and I'm now guaranteed to have fresh stock whenever needed.  Fabulous.


And the final taste test?

Not only is there an obvious difference in color between the Swanson Low Sodium Chicken Stock (on the left) and my home made version (on the right), they smelled completely different.  The processed version had this almost gross fake chicken smell to it.  And because I was afraid that my opinion was tainted by 7 hours of simmering, I had an unbiased third person do the sniff test too, and he completely agreed.  When I actually used the stock (for some soup I made) the difference in taste was easily discernible. 

I think homemade stock and I will have a long, happy life together.


Sunday, January 16, 2011

Cooking is "sew" much fun!

Ok, ok apologies for the terrible pun.  I couldn't help it; I'm corny.

I know it's not the best picture, but you try getting a 3 year old to stand still for a photo.
Last weekend my siblings came to visit me.  It was the first time we've all been together outside of organized family functions.  We had a great time together.  My little niece was there as well and one of our favorite things to do together is bake "cakes".  Technically we bake just about anything, but you try explaining the difference between cake and brownies/banana nut bread.  

So the last time I saw my niece I tried, unsuccessfully, to get her to wear my apron.  However, she quickly pointed out that "it's too big."  Well this time I decided it was time for little miss Hope to get her very own apron.  I looked online for a couple of how-to's to make an apron and really didn't find anything that I particularly liked.  This one is an adaptation of several blog versions and a pseudo-hack of Williams Sonoma's children's apron.  It took about 1 yard of the base fabric and 1/4 a yard of the accent fabric.  For the record, she loved it and we spent all weekend whipping all kinds of tasty food...until I decided it would be a great idea to grab the handle of a skillet that had been in a 425 degree oven.  Didn't work out so well, but on the brighter side, I'm keeping my "destined to injure myself somehow during any project" streak going.  I also sliced my finger with my rotary cutter while sewing the apron.  Maybe that's not such a bright side, after all.  I am definitely in the running to be the first person who actually needs to live in a bubble, but I digress.

Are there any kiddos in your life who need an adorable apron?  If so, here are the instructions!

Materials:
  • 1 yard base fabric, 1/4 yard accent fabric
  • Basic sewing equipment: rotary cutter, scissors, sewing machine, thread
Instructions:
  • Fold a 14"x30" inch piece of fabric in half lengthwise.  Eyeballing where you want the armhole to go, draw a semi-circle with something for marking fabric.  I think I measured about 6" in on the top and about 20" up on the side.  

  • When you're satisfied with the armhole locations, cut them out.  Repeat with another piece of fabric the same size.  I used two different pieces so I could enclose the seams.  If you're not worried about it, you could simply use one.

  • Cut out the rectangle for the pocket.  I completely eyeballed this.  I think it was about 4"x10" total.  Fold 1/2 in around the entire rectangle and iron.  Topstitch what will be the top of the pocket.  Place the pocket on the front piece and topstitch it to the apron.  Don't top-stitch the top or you'll sew down down the entire pocket!  I also sewed down the middle of the pocket to create two small pockets, instead of one large pocket.  (And sorry, I forgot to the take a picture of this step.)
  • Ties and what not- Cut out 2 strips of fabric from you accent fabric measuring 3"x15".  This will be the neckties for the apron.  Fold the strip in half and iron, unfold.  Fold each raw side inward to the crease you just ironed in.  This will leave a folded edge on the outside.  Finally fold the entire thing in half lengthwise.  Sew down with a straight stitch as close to the edge of the tie as you can get.  I chose to miter the edges, but feel free to simply tack it down on itself.  Repeat twice with the base fabric to make the side ties.

  • Assembly time!  Put your apron pieces together right sides facing.  Place the side ties midway up the apron.  Leave a small section of the ties sticking outside what will become your seam.  The rest will between the two apron pieces.  Pin the pieces together, except the bottom.  Sew all the sides with a 1/4" seam, except the bottom.  Once sewn together, cut the excess tie pieces from the sides, flip right side to and iron all the seams flat.

  • Sew on the neck ties.  Pin the neck ties about an inch in and an inch down on each side.  Sew a square around the entire side and an X across the middle, without picking up the needle at each corner.

  • Lastly, fold the bottom of the apron under slightly rounding the corners.  Topstitch down.  Iron one more time and you're finished!  
The entire project took me less than an hour and cost about $15.


Wednesday, January 5, 2011

Tales of a Craigslist Adventure


I moved over Christmas break!  (Goodbye leaking roof and terrible landlord!) I love my new place, but it was missing a pantry in the kitchen.  This is a huge problem for me because: (1) I am addicted to kitchen gadgets and (2) I am addicted to food.  So as soon as I moved, I set off to find something I could use as a pantry.  I'd already decided I wanted a cabinet of some sort, basically a tv armoire or a computer cabinet.  And 2 short weeks later, Craigslist came to my rescue (again).

Not a bad way to spend 20 bucks
I knew it was going to be an adventure when it required I rent a giant moving truck from Home Depot to pick the bad boy up.  It was quite the sight watching my tiny self drive this giant "man's man" truck through the streets of Dallas.  And to the relief of the Home Depot guy I managed to drive it without injuring the truck, myself, or innocent bystanders.
Driving the giant truck.
If it looks like I'm cracking up laughing, that would be correct.
I've been wanting to chalkboard paint something forever and I figured a makeshift pantry would be the perfect place to start.  And even better, my favorite column, "before and after basics",  on my favorite blog, Design Sponge,  recently posted some helpful hints about chalkboard paint and tape designs, so I figured it might just be divine intervention. I fully plan on scribbling recipes and my grocery list all over that thing.

Want to create one yourself?  Here's the how-to:

Materials
  • Chalkboard paint
  • Painters tape
  • foam paint roller  (Don't buy the cheap-o ones.  Get a nice smooth one, because it's essential for the paint to be a smooth as possible.)
  • Something to paint
Steps
  • First step is to tape off any letters or designs you do not want to be painted.  I chose "eat" because it's going in  my kitchen, and I needed something to make it look less like a TV cabinet.  The trick to tapping the letters is going slow and being precise!  Seriously, taping the letters took up the bulk of the total project time.  The other key is to press firmly on the tape to ensure that it adheres to the wood.  The better your tape is stuck down the cleaner your lines will be in the end.

  • Paint.  It took two coats of the chalkboard paint to get good coverage on the cabinet.    There's also a 4 hour drying time between coats, so that slowed the process up some.
And no, I generally do not paint or do craft projects in my kitchen, but that thing was too heavy to drag out of there so I improvised. 
Coat #2

  • Peel off the painters tape- slowly.  It also helps to pull in the same direction, with the same amount of pressure.  This helps gets as clean of lines as possible.  If you find a mistake (and believe me, I had several) you can always go back and touch it up or scratch it off with something.  (I find that fingernails work wonders.)


I love the contrast of the matte chalkboard paint against the slightly glossy wood.  

In context without the painting mess. Once the 3 day curing process finishes, the thing is going to be covered in chalk.  :)

Now to finish the inside shelving, which will involve an electric drill, a 3/16" bit, shelf pins and a bit of hilarity if I'm guessing correctly.  

Friday, December 17, 2010

And that's a wrap!

One of my favorite Christmas activities is figuring out my "wrapping paper scheme" as I like to call it and decorating all of my gifts.  Yes, it takes a ridiculous amount of time and energy and money, but it makes me happy.  And yes, I understand I will likely not wrap presents like this when I have children and I'm wrapping a billion gifts.  However, as of now I only wrap a few and they're going to be as pretty as I possibly can make them.  They make me happy and I hope they make you happy too.  Here's this year's wrapping paper scheme.


Steps and Instructions (and I'm aware I'm probably the only person who'd have multiple steps required for wrapping their presents.)

Card Materials:
  • 5.5" x 8.5"cards.  I purchased these and envelopes in a package of 25 at Michael's for $3.00
  • Coordinating thread- I used red, green, and silver.
  • Sewing machine
  • Computer
Steps:
  • So I'm not the best calligrapher, but I like to pretend that I am.  So to "cheat" I use this sneaky method: I'll design the wording on a card and then print it a couple shades lighter than the pen I'm using.  I then trace over the words with a calligraphy pen and presto! instant calligraphy quality without the calligraphy skills.  I did this first and then printed out the card.
  • Sewing: sewing on paper is very similar to sewing on fabric.  If you can sew a straight line, then you can sew these cards.  The only trick is adjusting the tension on the thread.  I usually decrease mine to the lowest tension setting.  Sew straight lines in whatever shape/pattern/color you choose.  I tried to create a sort of plaid pattern with this one.  You could sew far less lines if you'd prefer.  Keep adding lines and colors until you're happy.


  • Tie each thread into a knot and cut the excess.  You could also tape it to the inside of the card or leave it loose for a rustic homemade look.  To be honest, I did a combination of all three.

  • Hole punch the left sides and set aside.

Christmas Birdie Materials
  • Gray and white felt
Using this template from Design Sponge, cut out the bird and the wing shapes from the coordinating fabric.  I chose not to include the legs, but feel free to do so if you wish.  Glue the wing to the bird, draw on an eye, and set the completed bird aside.


Package assembly time!  Wrap your gift in brown packaging paper.  It's my favorite thing to wrap gifts with and I always have a roll of it on hand.  

  • Cut a LONG length of yarn.  I used red and white yarn with glitter running through them and about 8 feet of each color.  The beauty of using yarn over ribbon is that you can use a ton more and each huge spool of yarn only costs around $3.
  • Thread the yarn through the holes in your card. 

  • Wrap the yarn around the present and tie in a bow.  

  • Hot glue the bird to your bow and admire!  


Seriously makes me happy.  

Thursday, December 16, 2010

It's the Most Wonderful Time of the Year!

So now that school is finally over, it's going to look like Santa's workshop in my apartment for the next couple of weeks.  I am very excited to get a couple of projects done that I simply haven't had time to do during the semester. Be on the lookout for some of my craziest endeavors to date, including painting a rug.  And yes, I did just say painting a rug.  In the meantime, I've finally created a logo to put on things that I create and may eventually decide to start selling.  Really it was just an excuse to play around on Photoshop, but I can do that now, because I have free time! :)  Hope you like it, and good luck finishing (or starting if you're me) any Christmas shopping/crafts/plans!


Saturday, December 11, 2010

Prayers in a Basket

So it's finals, law school finals.  What I had, until recently, considered the most important period of my life. I have a tendency to get so caught up in finals that it becomes my life.  That ended up being my demise last year, and I have worked really hard to find a better balance this semester, but I still had a tendency to lock myself to my textbooks for weeks on end.  That is until a friend of my reminded me that there are things so much more important than law school.  Someone who reminded me to tell those who are close to me how much I love them and not take what I've been blessed with for granted.

So, even though it's finals, even though I could study for 20 straight hours and not be ready for my final on Monday, I don't care.  I'm going to get up tomorrow morning, and I'm going to cook brunch.  I'm going to sit with my puppy, my boyfriend, my coffee, and I'm going to ignore the rest of the world.  I hope you'll do the same.

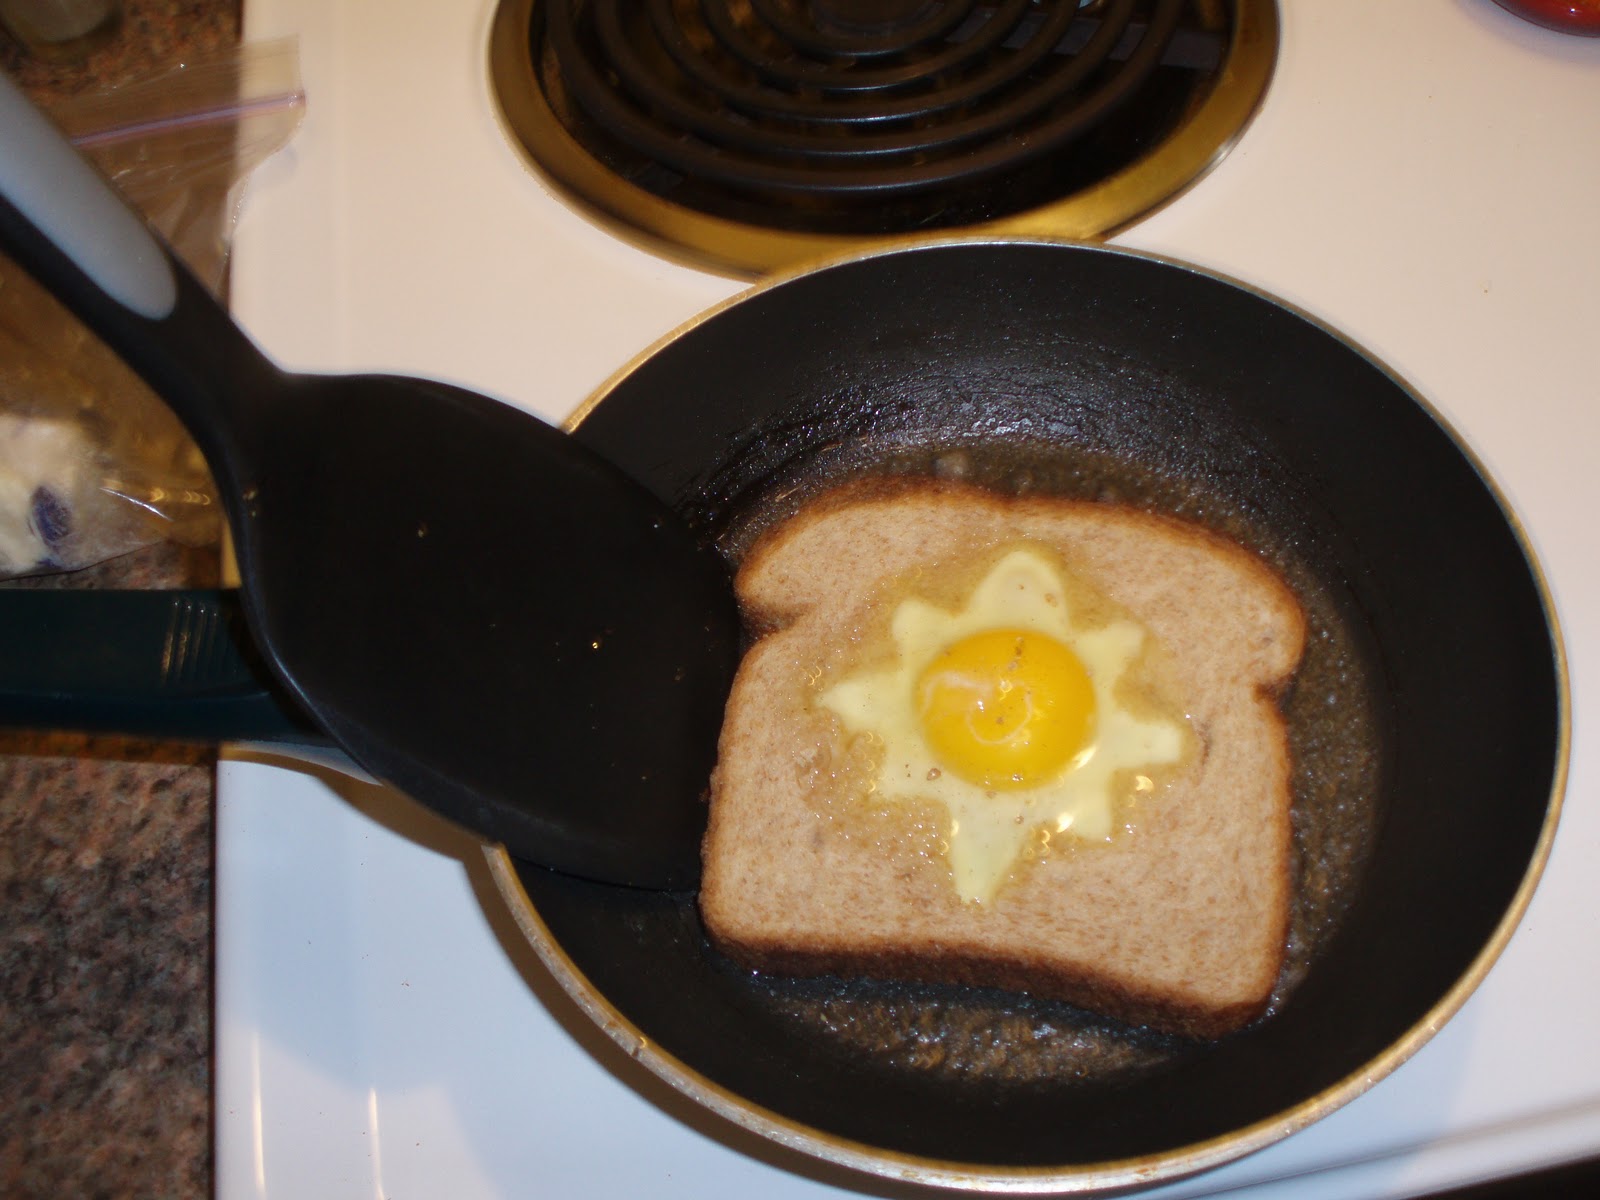
And here's a super quick easy recipe to try out.  It's usually called "eggs in a basket", but for this week I'm calling it "prayers in a basket."


Ingredients:

  • eggs
  • bread
  • olive oil/butter
  • salt and pepper to taste
Instructions
  • Take a cookie cutter of any shape/size (it just has to fit within in the size of your bread) and cut out the shape in the middle.  For "intricate" shapes, I find it's easier to flip the piece over and just push the bread through the cutter, but that's just me.  Don't throw away the cut out!  I like to toast it by itself and eat it.
  • Heat about 1-2 tbs of butter and olive oil in a non-stick skillet on medium heat.  I like the combination of the two because I feel like it gives the best results in terms of taste and cooking abilities.  Feel free to use only one or some other oil.  
  • Toss the bread into the skillet and cook for several minutes until lightly browned.  (You want the bread to develop a nice color before you put the egg on.  If you put the egg on too early you'll have to cook it for too long and it'll be overdone and gross.)
  • Once the bread is nice colored, slowly pour the egg into the cutout.  I like to pre-crack the egg into a small cup, because I'm incredibly messy when cooking and I don't trust myself to crack an egg into a pan without making a huge mess or burning myself.

  • Let the egg cook until the bottom is white.  DO NOT OVERCOOK.  Nothing is worse than overcooked eggs.

  • GENTLY use a spatula to flip the bread onto the other side and cook for 1-2 minutes more.  Again, do not overcook.  Once finished, remove from the pan and let cool.  Cook the cutout if desired like a piece of toast
  • Serve with some tasty coffee and enjoy!


Tuesday, November 30, 2010

I believe in pink...and a great craft project.

"I believe in pink. I believe that laughing is the best calorie burner. I believe in kissing, kissing a lot. I believe in being strong when everything seems to be going wrong. I believe that happy girls are the prettiest girls. I believe that tomorrow is another day and I believe in miracles." -- Audrey Hepburn

The Before

And After

While shopping with a friend a while ago, we stumbled across a super cute frame with the famous Audrey Hepburn quote.  It was pink; it was adorable...it was $75.  Woah. Woah. Woah.  $75 for a Photoshopped quote and a spray painted picture frame?  NO way was I paying that when I knew I could make it.  So I promised my friend a replica would be showing up at her door sometime soon.

I messed around with several different versions of the quote on Photoshop, but never settled on one I really liked.  Cue super creative graphic designer to the rescue.  I stumbled across a fantastic blog called Love Obsess Inspire with Free Printable Goodies.  Not only are they very cute, they're free!  Bingo.  

Then I decided to get a little crazy.  What if I printed the quote on fabric instead of paper? I'd seen the process a couple of time before and had really been wanting to try it.  And that's what I did.  You simply cut a piece of fabric to a size that your printer can handle, iron it to freezer paper (which is NOT the same as wax paper), and gently feed it through your printer.  Worked liked a charm.  I loved the results.  Pretty sure I may start printing everything on fabric: resumes, invitations, my grocery list...

A little picture frame demolition, spray painting, reassembly and I'd succeeded in creating a much cuter, much more unique, and much cheaper version than the one we'd originally found.

I'll post the entire how-to soon.  Law school finals are upon us, and suffice it to say free time has been hard to come by lately.  However, I did manage to get my apartment decorated for Christmas and am thoroughly convinced it's much easier to learn about fee simples, expansions of the commerce clause, and securities law by the light of my tree.  :)